Are you set to revolutionize your custom apparel business? Printing DTF film is the revolution baltimore you’ve been waiting for: vibrant, durable and stretchable designs that screen printing and DTG can’t come close to.
The New Era of Customization: Why DTF?
Well, just picture a tiny studio with a printer rhythmically humming gently in the background. On the desk is a pile of blank hoodies, polyester jerseys and even a few canvas tote bags. You used to have to have separate machines for every fabric. But with printing on DTF film (Direct-to-Film), one technology rules them all.
There’s no denying that this process is revolutionizing the sector, but what is it about it that is making waves? DTF is different from traditional processes in that pre-treatment is not necessary. Dark cotton, bright synthetic blends, no matter what you’re working with, the colours remain vibrant and the “hand feel” stay soft.
Step 1: Digital Preparation and Printing on DTF Film
Every masterpiece starts on a screen. The first step in learning dtf how to use is mastering your software settings (like RIP software).
The Setting: You have a complex multi colored logo that you just finished in Illustrator. You’ve been laboring over the gradients, making sure the neon edges are crisp, for hours. Now it’s time to go from digital studio to real world. Then you launch your Raster Image Processor (RIP) software, the brain of the operation that takes your artistic vision and turns it into printer-speak.
The Action: You load your high-quality PET film into the Huedrift printer. You can actually feel the quality of matte finish of the film-a big feature that stops ink from bleeding and makes every drop of the inks everting exactly where it should. The printhead, with a simple click, starts its accurate dance on the film.
The Specifics: The printer prints the CMYK colors first on DTF film followed by a thick layer of white ink. This white layer serves as the “canvas” for your colors, and lets them stand out even on pitch-black fabric. Unlike in DTG, where ink is absorbed into fibers and can fade, DTF ink rests on top of the film waiting for the adhesive powder to form a firm shield. This two-layer printing technique is also why DTF has such a bold “high-density” feel.
Pro Tip: Always remember to mirror your image before hitting print. Because you are stamping the design onto the garment, the digital file needs to be mirrored! Also, make sure that your white ink opacity is the right level in your software—typically between 60% and 80%—so that you have good durability without a soft, flexible feel. Too much white ink will give the design the look of a heavy patch, not enough and the colour of the garment will bleed through.
Step 2: The Magic Touch – Applying the Adhesive Powder
As the film slides out of the printer, the ink is still wet. This is where the chemistry happens.
- The Process: You take the wet film and evenly sprinkle the DTF hot-melt adhesive powder over the printed areas.
- The Visual: Watch as the white powder clings only to the wet ink, leaving the transparent parts of the film clean.
- The Trick: Give the film a light “flick” or tap it with an automated shaker to let the excess powder fall off. If you let loose powder rest on the film wafer, you will get “speckles” on your ultimate garment.
Step 3: Curing the Film – Melting for Durability
Now that your film is powdered, it needs to be “cooked.” This step turns the powder into a powerful adhesive resin.
H2: Mastering the Curing Stage: DTF How to Use Heat Effectively
To ensure your design survives 50+ washes, curing is non-negotiable. You can use a specialized DTF oven or even a hovered heat press.
The Setting: Set your oven to approximately 150°C (302°F).
THE TRANSFORMATION: Insert the film for 2 to 3 minutes. Through the glass, you observe the grainy white powder changing into a smooth, orange peel finish glossy across. This is the equivalent of the glue being “activated” and now it can start bonding with the fabric fibers.
Step 4: The Heat Press – Bringing the Design to Life
This is the most satisfying part of the journey. The transition from a piece of plastic film to a high-end piece of clothing.
Preparation: Place the item of clothing on the heat platen. Do a quick 5- second “pre-press” to eliminate moisture and wrinkles.
Alignment: Position your cured DTF film design-side down on the fabric.
The Press: Press about 15 seconds with pressure of 1.6 bar (medium-firm) at 320 ºF (160ºC). 70 from Adding the Time from the Top As you hear the timer beep and lift the press, the heat has pushed the melted adhesive into the fabric’s weave, forming a permanent bond.
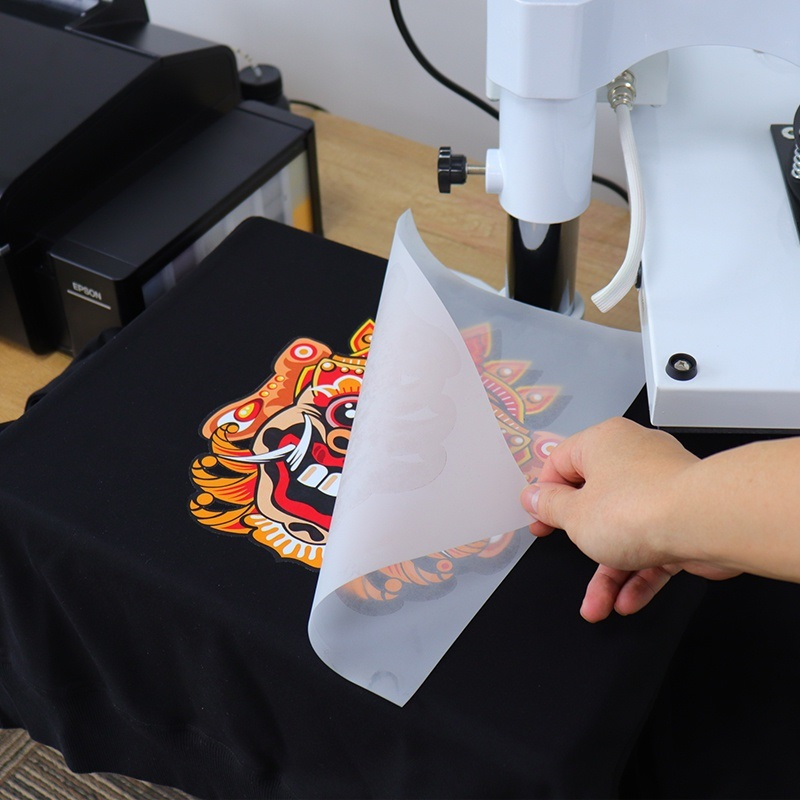
Step 5: The Reveal – Cold Peel vs. Hot Peel
The final step requires a bit of patience, depending on the type of film you purchased from Huedrift.
- The Cold Peel Experience: Most high-quality DTF films are “Cold Peel.” This means you must wait for the film to cool down completely to room temperature.
- The Action: Once cool, grab a corner of the film and pull it back in one smooth, confident motion.
- The Result: The PET film peels away cleanly, leaving behind a sharp, vibrant, and incredibly flexible design that feels like it’s part of the fabric itself.
Final Touch: We always recommend a “finish press.” Place a piece of parchment paper over the design and press for another 5 seconds. This mutes the plastic shine and gives the print a premium, professional matte texture.
Why Choose Huedrift for Your DTF Journey?
Understanding dtf how to use is only half the battle; the other half is using the right equipment. Low-quality films lead to cracking, and cheap inks clog your printhead. At Huedrift, we specialize in providing the stability that growing businesses need.
Our printers and consumables are designed for:
- Consistency: No more color shifting between batches.
- Reliability: Industrial-grade printheads that don’t quit.
- Support: We don’t just sell you a machine; we help you master the craft.
Conclusion: Start Printing Today
The whole process starting from the application of digital sketch to the final peeling off is printing on the DTF film, it has a level of freedom with creativity that small-to-medium enterprises previously could not reach. It’s cheap, it’s flexible, and it’s surprisingly simple to learn if you just go through these 5 steps.
Would you like to stop dreaming and start making? Visit Huedrift.com today to shop our selection of DTF printers, films, and inks.
Your journey to professional apparel starts with the right partner.